Showing posts with label Sewing. Show all posts

Monday, June 20, 2011

Padded Camera Strap Cover

Two weeks ago I was at Joanns and saw fabric that made my heart go pitter patter. I stood there running my hand along it trying to think up a project that I needed it for. Alas, it was not fitting the bill for my current to-do list. I went home, but just kept thinking that I had to have it! So what does one do? Search blog land until I find a project that I MUST have that fabric for!
That's when I went to The Cottage Home, for this tutorial. It seemed fairly straight forward, and it was. I was able to complete the entire thing while Jack took a nap, and I knocked two birds out with one stone - learning how to use fusible fleece, and make a ruffle for the first time! Here is a close up the ruffle, it's been flattened with an iron, and the edges sewn down.


Here she is, in all her pride and glory! Don't mind Jack's activity mat. To justify my purchase (but come on, lets get real here, I got a quarter yard of each, for $0.87 each, no justification needed!) I told Josh that I made this because he says the strap always digs into his neck. He smelled my lie a mile away, and said thanks for making it girly LOL. Whoops, busted. Aren't the fabrics cute?!


Monday, May 16, 2011

Sponge Bob Cart Cover


Back when I was pregnant and we were filling out our registry at BabiesRUs... I was really disappointed with the selection and cost of the cart covers.  They were either super girly or super lame.  It didn't take long for me to snuff my nose at them and declare that I could make one cuter.  Fast forward to few weeks ago when Jack graduated to his big boy car seat and all the sudden we couldn't just tote him around in his carrier anymore.  Crap.  One raised-eyebrow-smart-alecky-humorous-look from Josh and I went to Joanns on a mission.   Sponge Bob is big in our house - Josh and the girls LOVE him, and I think hearing him all the time while he was still in my tummy, Jack has loved Sponge Bob from the day his eyes could focus on the TV screen. So when I saw this fabric, I grabbed it.

Then it sat on my sewing desk for a month.  Enter more raised-eyebrow-smart-alecky-humorous-looks from Josh.  Ok so the problem was... I got a McCalls pattern but it was way more complex than I needed - pockets.. ruffles (ruffles for Jack? ahno) and I'm horrible and winging it so I kept putting it off.  Then Josh reminded me that I spent a grand total of $8 on fabric and if it doesn't work, then there really isn't much lost.  So I went for it. 

Whatya know, it turned out!  Here is what I did:

I cut a 45in square out of both pieces of fabric (sponge bob, and coordinating fleece for some added softness), rounding the corners.  I measured 16 inches in (based on internet searches for cart measurements) and cut two 5 inches squares for leg holes.  I put right sides together (like a pillow case) and stitched all the way around, leaving a few inches to be able to flip it right side out.   

This next step you can do as I did but I don't recommend:  While right sides are still together, stitch leg holes together using a thick zig zag - realize that you hadn't turned it right side out yet, try and rip the stitches out but since you did a thick zig zag it's not going anywhere, and have to cut your 5 inch holes to 5.5 inches.

Once I flipped it right side out, I stitched the leg holes (again)... since I wasn't sure if this was even going to work, I left the edges raw.  I did choose the zig zag stitch because I thought it might reinforce it a little better than a regular stitch.  If I were making this for someone else, I'd go the extra step to hem it. 

Next I went back to the hem around the edge, going in about an inch and creating another hem all the way around.  I did this so the elastic would stay in place. Once it was stitched, I fed the elastic through, sewed the ends together, and stitched up the hole I left at the beginning and it was done!


I might be biased, but isn't he so stinkin' cute?! 

Linking to:


Tuesday, March 29, 2011

Kitchen Cafe Curtains

Remember a few postings ago when I asked if fabric was cute or not? Well, I splurged and got it!  I couldn't make my kitchen curtains fast enough, I was so excited.  Wouldn't you know, the down fall of the whole hanging curtain debacle would be Josh and I?  Apparently.. we are unable to purchase curtain rods like normal human beings.  First Josh purchased 2 rods that were too small.  Then I picked up what I thought was a 2-pack but was really a double rod... All I wanted to do was hang my curtains!

Now, don't mind the rest of my kitchen/living room in the picture.  We have officially outgrown this home and can't wait to move to a bigger place but it's just not going to happen for a little while yet.  So these curtains are my first attempt post-accepting-we-are-here-for-at-least-another-year-so-I-better-make-it-cute-and-as-liveable-as-possible.  So look at the pictures as an opportunity to see all the cute things I can do to make the space awesome while we are in it! 

I haven't been home when lighting is optimal so my apologies for the harsh lighting...


 Hiding behind the 2 bottom panels is an AC window unit.  We are so grateful to have it but man it's an eyesore!  You can see the little top of if sticking thru the window. All the more reason to just cover it all while not in use! Hmm... I also need to pretty up that space on the wall where a phone base is no longer needed!

I am so in love with them.  Next I want to make a fitted curtain for the pocket window on the door just to the left of this window.  I also think I'll have enough fabric left over to make cute place mats.

All I need to do now is finish those two things, get a farm house table with a bench, paint the cabinets white (woohoo, Dad aka landlord gave the green light.. I'm scared to do it though!) paint an accent wall and hang a shelf... I can do it!!

Saturday, March 26, 2011

Pencil Pouches & More Silhouette Fun

I have spent the day with a cranky, teething 8 month old and two poor little girls with the stomach flu.  What a day. There were moments of chaos and ickiness but in the down time I actually got a few sewing projects finished up that I had been meaning to do.  The plus side to staying home all day!

Anytime I clean out the girls' backpacks there are always a ton of broken crayons and pencils at the bottom.  I was tired of throwing them away so I decided to make these little pouches.  I found the cute fabric on sale at Joanns. 

I just ordered smooth heat transfer paper for my Silhouette so this was a thought out opportunity to try it!

If I could give one tip to any new users... after you apply the heat, let it sit a minute and cool before taking off the transfer paper.  I couldn't figure out why it wasn't sticking - I was being too impatient!

 Sorry for the bad lighting, the sun disappeared before I could take decent shots!


Off to do a mountain of laundry....

Monday, January 3, 2011

Baby Olivia!

I have been wanting to post about this for-ev-er! But a horrible sequence of events prevented me from doing so.  I don’t think Josh’s sister, Jenny reads my blog, but… I didn’t want to take the chance.  She is due with a baby girl the end of this month.  Her baby shower was several weeks ago, but I woke up sicker than a dog the day of, and didn’t think it would be very responsible to go get a preggo lady sick!! 
So finally, I can reveal what I made.  So much of a cute gift is in the packaging. So I wanted to get a cute basket.  Her baby furniture is white, so it seemed pretty smart to spray paint the basket white.
Back Camera
I had originally wanted to get a small chalkboard plaque to write her name on, but it wasn’t happening.  So I went to Joanns and found this cute little plaque.  Some paint, distressing, and scrapbook paper… and I ended up with this! The letters didn't show up well in any of the pictures. It's light in person too, but not this light!
olivia sign
Now to fill it!  Pattie had just showed me her first rag quilt she finished and I was in love.  I was even more excited when she told me about a baby-blanket sized pattern that was in the book she used.  She gave me the instructions and off to Joanns I went.  It was actually really easy!! 
I started with 9 fabrics: 3 darks, mediums and lights.  Sticking with a baby theme, this proved to be harder than I thought! Jenny also isn’t a foo-foo super princess-y kinda mom so I was trying to stay away from tiaras and fairies for the most part.  Once I was home, I cut all the fabric into strips (there are a million different patterns out there, so I won’t get too into the specifics on measurements.  I can send you them if you are interested!) and then you sew strips of the same fabric together, so its double sided.  Then, cut those into blocks.
PB057773
Next you sew your blocks into rows, then sew the rows together.
PB057771
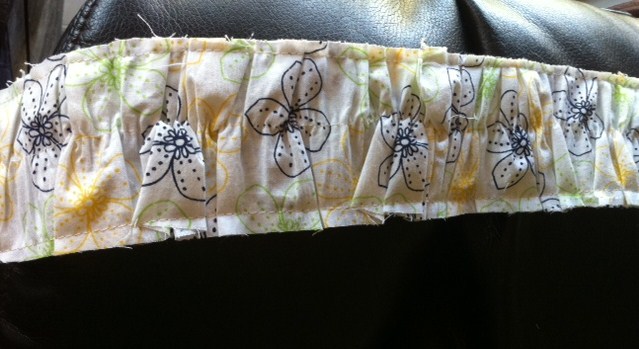
The trick is you leave a 1/2 inch seam on each block.  Then when you are done, you go back and cut about every 1/4 inch on each seam (highly recommend spring loaded scissors!) … and ya, it takes forever!  Put in a movie, stretch your arms and get to work!  Then when you are done, wash, dry, and bam! its all puffy and cute!! 
I was so in love with how this turned out! The best part is, all the ruffles and fluff hide your mistakes. Smile
PC238071PC238073PC238075
The one other thing Jenny mentioned that she needed was a new boppy cover.  She had almost all the baby essentials already from when her son was a baby… now she just needed it girly.  Just so happened I had just made a new cover for Jack’s boppy so I had the pattern ready to go.  I fell in l-o-v-e with this fabric:
PC238083
Isn’t it cute? And not princess-y at all!  This is only the 2nd time I’ve put a zipper on something (first one was Jack’s boppy!).  It’s easier than I had thought, for sure. 
PC238082
It’s definitely not perfect, but I got the fabric on sale for $2.50 a yard, you can’t beat that!
PC238084
So that’s what I made for Jenny.  I was so excited to give it to her! Here was the finished product:
PC238068
Sorry for the lame setting, I took these pictures in the hours before Christmas scramble when I knew I’d be giving her the basket and was running out of opportunities to take pictures! 
PC238070

Saturday, January 1, 2011

Another Christmas Gift - Superhero Cape!

Ok, I'm just gonna put this out there now to please excuse a)all my iphone pics, I was so lazy about getting out my camera, the only time I did was when I lost my phone for an entire day 2 days before Christmas. (I have never lost my phone before!) b) the mess in the background of all the pictures! Just keepin' it real people.

Anyway, Josh's sister, Jenny, told me that her son Kai LOVES wearing the capes they have at his school, and could I make him one?  How cute is this:  I asked Jenny what is favorite color was, and she laughed and said pink.. soooo why don't we go with red.  ha!  Now thats a cool kid.  If you know Kai, you know he's obsessed with the Disney movie, Cars.  So when I was getting the red fabric I couldn't resist sneaking in some Cars fabric for the inner lining.  I added a super hero "K" on the back for good measure. 

There are a million guides and templates online for how to make the perfect cape.  Jenny told me he's just about 3 feet tall, so I ended sizing down 1 yard of fabric to about 26 inches when it was all said and done.  Then I cut it at an angle so the top was narrowed in from the bottom.  I added a seam for a drawstring, and that was that! 


(it was laundry day, my sheets were in the wash, ha!)


I am hoping Jenny will send me a picture of him in it, if he ends up wearing it.  Kai is shy (also terrified of Josh, haha!) so he wasn't into trying it on Christmas day!

The thing I love about this too, is that I think like many people, we were on a tight Christmas budget.  For the money I spent, this means a lot more than what I could have gotten as an equivelent toy for the cost.   Here is the break down:

Cars Fabric:  $8.99 - had a 40% off coupon so the cost was $5.39
Red Fabric:  $3.99
Felt for the K $.59 (I think!)
Black Shoelaces:  $2.99
Thread - already had
Total Cost:  $12.96 (plus some tax!)